Features
Crop Protection
Flowers
Water and irrigation
Is your water a source of plant disease?
How to sample and choose the right tests to find out.
September 8, 2020 By Dr. Sarah Jandricic and Dr. Chevonne Dayboll
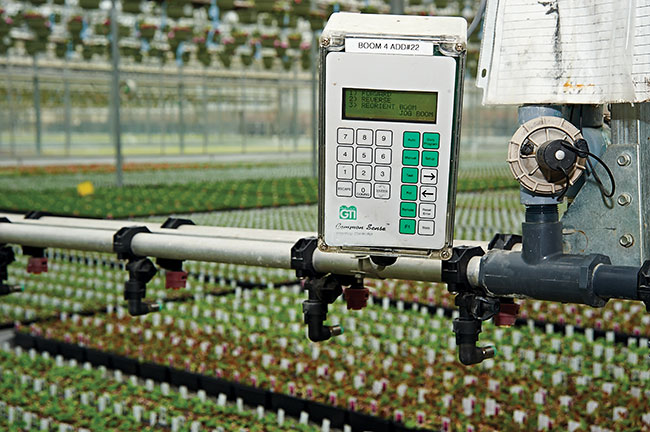
 Whether it’s a boom, spaghetti or flood bench irrigation system, be sure to sample the water being delivered to the crop to determine if there are pathogens coming from it. Image credit: OMAFRA
 This is part 3 of the water sanitation series.
After reading the previous articles in this series, you’re now aware of which pathogens can be spread through your irrigation water, where they can accumulate, and why that’s important.
So what can you do about it? This third article in the water sanitation series will walk you through how to sample water sources on your farm, and which tests you can run to determine if your water is helping – or hurting – your crop.
Water Testing Labs
Several labs in Ontario will process water samples and check for everything from nutrient levels and pesticide residues, to fungal and bacterial loads. Most sample for pathogens using a “DNA multi-scan”, which looks for bits of DNA from a wide range of known pathogenic species. But part of getting useful results from these labs is knowing where and how to properly sample. Here’s a compiled list of do’s and don’ts to help you get started.
Water Sampling Do’s
Checking your water for pathogens isn’t something you should do only when you think you have a disease problem. Just like monitoring for insect pests in your IPM program, checking your water should be part of your regular integrated disease management (IDM) program.
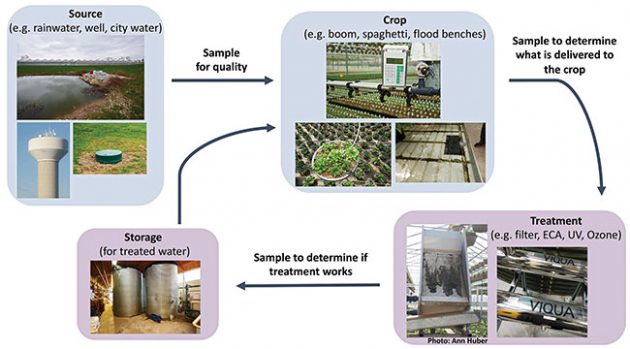
You’ll also want to look at different points along your irrigation system to determine which water sources are potentially contaminated and how this is flowing through your greenhouse.
When it comes to when, where and how to sample, consider the following do’s.
1. DO monitor at frequencies that relate to the level of risk. These include:
Different points in the production cycle (especially before a new crop goes in); when changes in source water quality occur (e.g. switching from roof water to water stored in a cistern), when sensitive crops are present (based on crop type and/or stage – this is why knowing your crop’s susceptibility to diseases before planting is important); when labour is available (no one will likely be sampling water in the middle of the Mother’s Day rush).
2. DO sample from all sources of water, and from various points along your irrigation system. This can reveal potential sources of contamination, and give you a picture of how pathogens are spreading throughout your farm. Testing along your irrigation system can also reveal issues with water pressure and distribution which may be causing wet or dry spots in the crop that can also lead to disease problems. Try to sample from locations that are close to where the water enters the production area (e.g. in the first few rows or benches) and those that are near the end of the line to gain a better idea of the problems you might be facing.
3. DO sample recirculating water before and after water treatment. This tells you if your chosen water treatment strategy is working like it’s supposed to. Never assume that it’s functioning properly. All systems need maintenance, and some need proper levels of active ingredient(s) to work, which can change frequently depending on the amount of organic matter in the system. Be safe not sorry, and follow a regular testing schedule to maintain your investment.
4. DO follow guidelines suggested by your chosen lab. There may be specific guidelines for collecting water samples and for general shipping and handling to make sure you get the best results. Read over these thoroughly before collecting and sending out samples. In a pinch, you can use disposable water bottles to collect samples, but ensure they’re rinsed with your source water well before taking a sample. Never use vessels that were used for another purpose (e.g. scoops for mixing fertilizer, your morning coffee cup of choice) to grab samples as they may leave residue that can affect your results.
5. DO have a consultant or specialist help you interpret the results of any tests. They can help you figure out which pathogens are pests for concern, and what to do about them. Stay tuned for a future article on the interpretation of various tests on ONfloriculture.com.

There are various points along your irrigation system that should be sampled regularly. To truly understand your water quality throughout the farm, it’s better to sample from multiple points at once than from one point frequently. Image credit: C. Dayboll
Water Sampling DON’Ts
What not to do can be as important as what to do. Consider these don’ts and make sure to come up with others that may apply to your own farm.
1. DON’T leave sampling until the last minute. Sampling should be a proactive activity, not a reactive one. But if you’re like many of us, a lack of time and having too much on your plate can mean that your water samples are taken after crops have gone in or after you spot something that isn’t quite right. Schedule regular water sampling into your calendar (or a trusted employee’s calendar) and make sure it gets done ahead of sensitive crop cycles or your big spring season.
2. DON’T be afraid to send in several samples at once, despite the cost. Whether you like to do a more thorough check of your irrigation systems twice a year, or you are facing a problem and don’t know where to start, having more samples can help you more accurately pinpoint a problem in the greenhouse, saving you time and headaches.
3. DON’T forget to factor in costs of regular sampling into your pest management budget. DNA multi-scan tests (that sample for all potential pathogens down to the species) cost around $250 per sample. A supply of 50 Petrifilms (used for general counts of unspecified fungi in water) cost $135. This is a drop in the bucket compared to possible crop losses of 10 to 50 per cent due to pathogens in recirculating water, so make room for them in your pest control budget. If you’re an Ontario producer experiencing an active pathogen issue and aren’t sure of its source or options for treatment, OMAFRA specialists may be able to cover some of the testing costs to help you figure out the problem.
On-Farm Water Testing
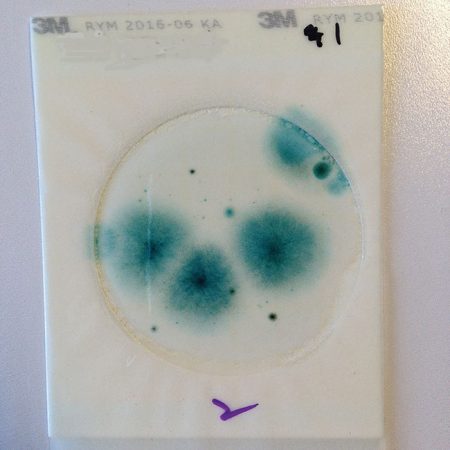
As a complement to lab testing, on-farm testing protocols have also been developed by the Soil Resource Group, as part of a Canadian Agriculture Partnership-funded project. These methods use adapted Petri dishes, called “Petrifilms” to grow fungi that may be in your water. Although more labour-intensive and less specific than lab testing, the Petrifilm method is relatively cheap and allows for rapid results and repeat testing.

A 3M yeast and mold Petrifilm growing various fungi. These films can be used to help quantify the amount of fungal pathogens in your irrigation water, and are a useful component of regular water testing. Image credit: OMAFRA
Learn more
This article is the third in a series from ONfloriculture.com about water sanitation. The series is meant to have you reflecting on your own irrigation system before you are faced with a problem.
Read the other articles in the series here:
- Finding water sanitation problems before they start
- Which pathogens are really in your water?
- Water sampling do’s and don’ts
Sarah Jandricic, PhD, is the greenhouse floriculture IPM specialist and Chevonne Dayboll, PhD, is the greenhouse floriculture specialist for the Ontario Ministry of Agriculture, Food and Rural Affairs. They can be reached at sarah.jandricic@ontario.ca and chevonne.dayboll@ontario.ca.
Print this page